If the humbucking pickups already installed in your guitar have 4
conductor wiring, that's great !!! Go back to the wiring page and
proceed from there.
Unfortunately, the humbucking pickups that are installed at the factory very
rarely have 4 wires coming out of them but if you can gain access to
the coils, you can install 4 wires to the pickup yourself.
WARNING: You should be absolutely sure of what you are
doing. If not, have your local guitar shop do this OR buy new pickups.
|
You'll have to remove the pickup completely from the guitar and remove the
pickup mounting ring. If the humbucker has a chrome cover, it might be
possible to remove it. These covers are usually attached by one or two drops of
solder. By applying heat from a soldering iron (for as little time as necessary)
these drops can be melted away and the cover can be removed. However, if you
have one of those chrome-covered, 'sealed-for-eternity', 'epoxy-filled'
"bricks", not only is removing the cover impossible, getting at the coils is totally
out of the question. Either be content with what you have or buy new pickups.
|
| |
|
|
Okay, now that the pickup is out of the guitar you have a much easier access to both coils.
The coils are wrapped with a layer (or 2) of tape which you must carefully
remove. There is additional tape underneath what you just removed but do not remove
this because it will expose the pickup windings.
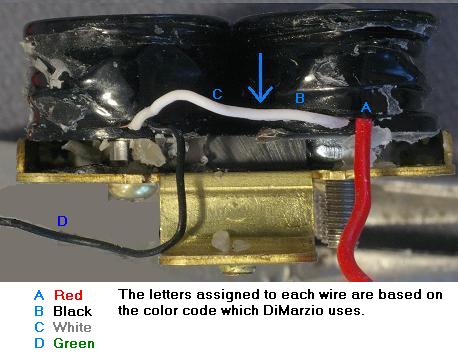
Now you must look for a small insulated piece of wire that connects
the left coil to the right coil, located where the blue arrow is
pointing in the diagram. Now with wire cutters and applying NO tension to this
wire, cut it in the middle.
The next step is to remove about ¼ inch of insulation from the 2 wire "ends" you
just created. You must do this while putting NO tension on either of
those wires. The safest way to do this is by heating the insulation with a soldering
iron, while being very careful not to let the soldering iron touch the coils.
| |
|
There were already 2 wires that were accessible (the black and red ones in the
diagram), remove the insulation from these (the black may not have insulation) and
now you have all 4 wires ready to be soldered. Shielded 4 conductor cable is
available or you could make your own. Some people like working with solid wire
as opposed to stranded, and 4 conductor telephone wire (the kind used for telephone
installations) is very suitable for this. You'll have to shield this wire and
one way is to use bare #18 stranded wire and wrap it around the 4 conductor
cable. (Depending on how much room you have for running wires in the guitar,
you may have to remove the sheath from the 4 wires, in order to make the cable
thinner).
|
| |
Your 4 color phone cable can be soldered to any connections you want but just to avoid
confusion, you should connect the wire colors according to the manufacturer you are
familiar with (DiMarzio, Seymour Duncan, etc.) When all 4 wires are soldered to all 4
terminals, tape up the soldered connections, solder the bare #18 wire shield to
the metal body of the pickup, then tape up the coils just as they were before you
removed the tape.
Put the newly rewired pickup back in the guitar and you are ready to try the
humbucker wiring options.